Implementing Custom Environment#
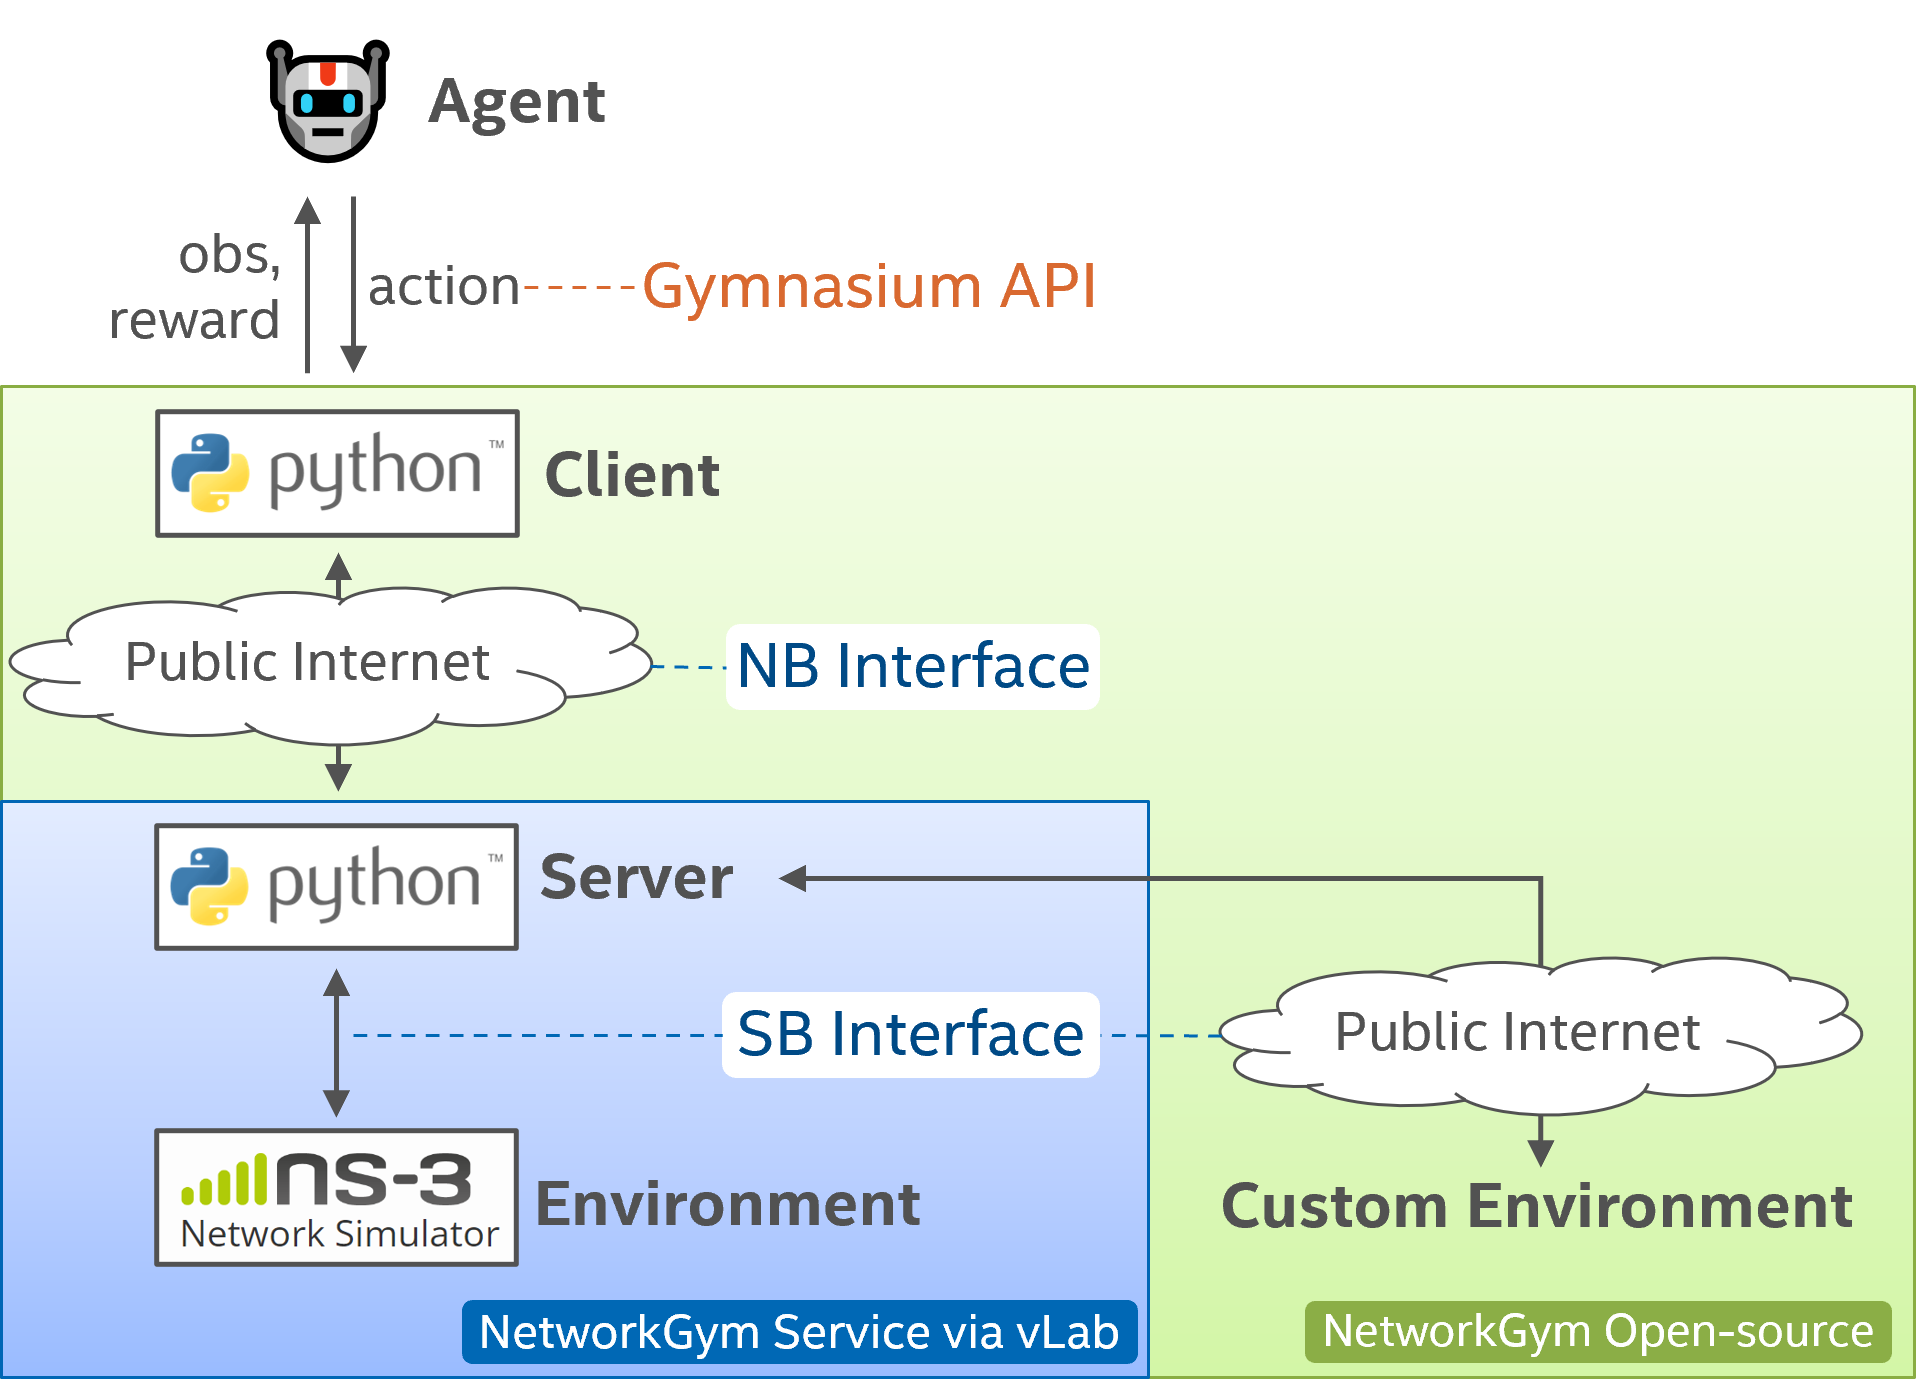
NetworkGym provides a diverse selection of standard network environments and additionally streamlines the inclusion of external customized environments through the SouthBound (SB) Interface. This tutorial equips you with step-by-step directions to create a link to the server utilizing your custom environment. You’ll also learn how to connect your agent/client to this environment for evaluation and ultimately merge it into the standard network environments.
Initiating your Custom Environment#
Linking your custom environment to the server follows the same procedure as connecting the client to the server.
refer to the Installation instructions in the NetworkGym GitHub Repo to install dependencies.
For external users (without Intel VPN), make sure you forward both port #8092 for the client and port #8091 for the custom environment.
Adjust the values for “session_name” and “session_key” in the network_gym_env/common_config.json file according to your assignment.
Once these steps are completed, you can launch your custom environment using the following command:
python3 start_custom_env.py
The expected output in the terminal would be as follows:
test-1: env_config socket connected.
test-1: send env-hello msg.
{'type': 'env-hello', 'env_list': ['custom']}
test-2: env_config socket connected.
test-2: send env-hello msg.
{'type': 'env-hello', 'env_list': ['custom']}
Warning
Please don’t modify the names within the env_list. All external users are limited to using the environment name ‘custom’. Only clients sharing the same “session_name” are granted access to this custom environment.
Connecting to Your Custom Environment#
Establishing a connection with your custom environment is a straightforward process through the provided demo. Adjust the env_name to “custom” as shown: env_name = "custom". Then you can launch the client using the following command:
python3 start_client_demo.py
The terminal should print the following info:
----------| step() at episode:2, step:10 |----------
Action --> [{'name': 'custom_action', 'custom_tag': 'Wi-Fi', '': {'user': [0, 1, 2, 3, 4], 'value': [0.9269856811, 0.5833047032, 0.6873341799, 0.0909367353, 0.3403381109]}}, {'name': 'custom_action', 'custom_tag': 'LTE', '': {'user': [0, 1, 2, 3, 4], 'value': [0.0730143189, 0.4166952968, 0.3126658201, 0.9090632796, 0.6596618891]}}]
          name  unit  start_ts  end_ts direction group    cid             user            value
0         rate  mbps     20000   21000        DL   GMA    All  [0, 1, 2, 3, 4]  [5, 4, 8, 5, 6]
1         rate  mbps     20000   21000        DL   GMA  Wi-Fi  [0, 1, 2, 3, 4]  [8, 8, 3, 9, 6]
2     qos_rate  mbps     20000   21000        DL   GMA  Wi-Fi  [0, 1, 2, 3, 4]  [4, 6, 7, 3, 5]
3         rate  mbps     20000   21000        DL   GMA    LTE  [0, 1, 2, 3, 4]  [8, 7, 5, 6, 6]
4     max_rate  mbps     20000   21000        DL   PHY    LTE  [0, 1, 2, 3, 4]  [4, 5, 4, 8, 8]
5     max_rate  mbps     20000   21000        DL   PHY  Wi-Fi  [0, 1, 2, 3, 4]  [4, 4, 6, 5, 3]
6  split_ratio           20000   21000        DL   GMA  Wi-Fi  [0, 1, 2, 3, 4]  [4, 7, 9, 4, 8]
7          owd    ms     20000   21000        DL   GMA    All  [0, 1, 2, 3, 4]  [4, 5, 4, 6, 3]
Presently, our support is limited to accessing custom environments launched by the same users. For instance, if you initiate a custom environment with the “session_name”: “test”, you can solely connect to this custom environment using the same “session_name”: “test” when starting the client.
Substituting the Dummy Simulator#
Once you’ve successfully established a connection between your client and the custom environment, you’re ready to substitute the dummy simulator with your proprietary simulator or testbed. Utilize the dummy simulator as a reference for interacting with the server via the southbound interface. Essentially, your task involves utilizing the southbound interface to establish a connection with the server, transmitting measurement data in JSON format, and receiving action instructions, mirroring the processes demonstrated by the Env_Sim Entity in the NetworkGym UML Sequence Diagram.
Additionally, it’s essential to modify the Adapter class located in envs/custom/adapter.py to align with the measurements and tags generated by your proprietary simulator or testbed.
Releasing Your Custom Environment#
Once you’ve completed your experiments in your customized environment, please contact us at netaigym@gmail.com to initiate the procedure for integrating the environment into our standard environments.