How to run
Runtime Parameters
Parameter |
Description |
|---|---|
|
show help message |
|
(For debugging) print internal debugging output |
|
Write dot files of resulting py-tree ( |
|
(For debugging) Produce tree output of parsed scenario |
|
Parse and resolve scenario, but do not execute |
|
Directory for output (e.g. test results) |
|
Parameter definition used to override default scenario parameter definitions. See Override scenario parameters for details. |
|
(For debugging) Show current state of py tree |
Run locally with ROS2
First, build the packages:
colcon build --packages-up-to scenario_execution_gazebo
source install/setup.bash
To run an osc-file with ROS2:
ros2 run scenario_execution_ros scenario_execution_ros $(PATH_TO_SCENARIO_FILE)
To log the current state of the behavior tree during execution, add the -t flag as an argument and run it again:
ros2 run scenario_execution_ros scenario_execution_ros $(PATH_TO_SCENARIO_FILE) -t
Additional parameters are describe in section Runtime Parameters.
Run as standalone Python package without ROS2
After installing scenario_execution using pip (see Installation with pip as standalone Python package), you can execute a scenario with the following command
scenario_execution $(PATH_TO_SCENARIO_FILE)
To log the current state of the behavior tree during execution, add the -t flag as an argument and run it again:
scenario_execution $(PATH_TO_SCENARIO_FILE) -t
Additional parameters are describe in section Runtime Parameters.
Run with Development Container inside Visual Studio Code
Prerequisites
If not already installed, install the docker engine on your system according to the installation instructions or, if you need GPU support, follow the nvidia installation instructions.
Make sure you follow the post installation steps.
To make sure, that the docker daemon is properly set up, run
docker run hello-world
Make sure you have installed the necessary Visual Studio Code extensions, namely the docker extension as well as the Dev Container extension.
Open Scenario Execution in Development Container
First, build the packages:
colcon build
Now, open the root folder of the scenario execution repository in Visual Studio Code by running
code /path/to/scenario_execution
in a terminal.
Make sure, that your ROS_DOMAIN_ID is properly set in the terminal you start Visual Studio Code from.
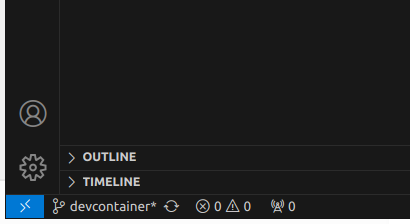
Then, click the blue item in the lower left corner
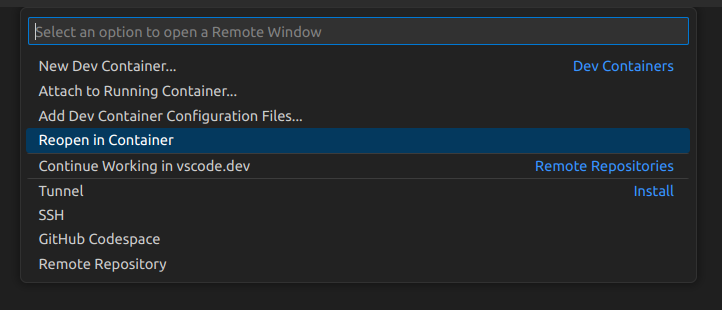
Afterwards, select "Reopen in Container " in the Selection Window inside Visual Studio Code
Now Visual Studio Code should build the development container and open your current working directory inside the container after it successfully built the image. If you now open a terminal inside Visual Studio Code, you can run and test your development safely inside the development container by running any of the examples (see Tutorials for further details).
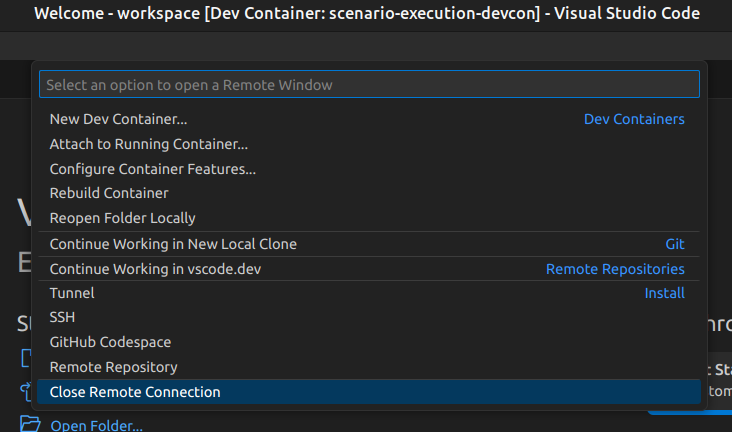
Once you are done, you can cancel the remote connection, by again clicking on the blue item in the lower left corner and select "Close Remote Connection"
Visualize Scenario with PyTrees ROS Viewer
Before getting started, ensure that the PyQt5 version 5.14 Python library is installed. You can check PyQt5 version using the following command:
pip freeze | grep -i pyqt
If any PyQt5 libraries are detected, it's recommended to uninstall them to avoid conflicts:
pip3 uninstall PyQt5 PyQt5-Qt5 PyQt5-sip PyQtWebEngine PyQtWebEngine-Qt5
Additionally, if the default PyQtWebEngine is present, remove it using:
sudo apt remove python3-pyqt5.qtwebengine
Next, install PyQt and PyQtWebEngine version 5.14:
pip install PyQt5==5.14
pip install PyQtWebEngine==5.14
Once PyQt is set up, clone the py_trees_ros_viewer repository:
git clone git@github.com:splintered-reality/py_trees_ros_viewer.git
After cloning, build the package using colcon build and source the workspace.
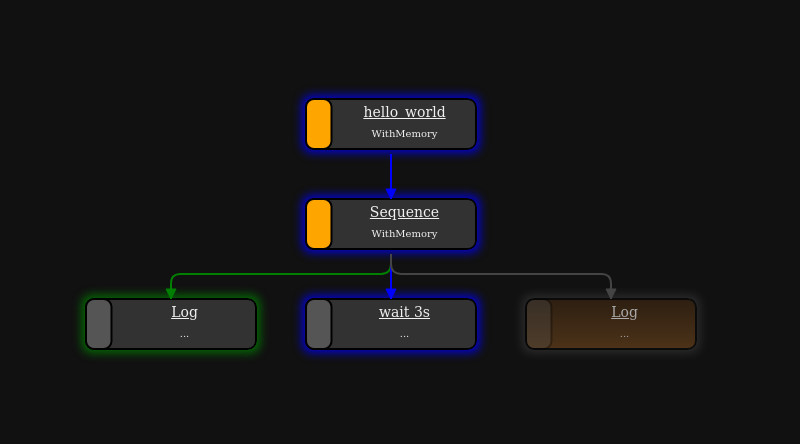
Now, to open the viewer, execute the following command:
py-trees-tree-viewer --no-sandbox
Finally, in a separate terminal, run the scenario file to visualize the behavior tree.
Example:
ros2 run scenario_execution_ros scenario_execution_ros =examples/example_scenario/hello_world.osc
Please note that this method has been tested on Ubuntu 22.04. If you are using any other distribution, please ensure that PyQtEngine works on your machine and render web pages correctly.
Scenario Coverage
The scenario_execution_coverage package provides the ability to run variations of a scenario from a single scenario definition. It offers a fast and efficient method to test scenario with different attribute values, streamlining the development and testing process.
Below are the steps to run a scenario using scenario_execution_coverage..
First, build the packages:
colcon build --packages-up-to scenario_execution_coverage
source install/setup.bash
Then, generate the scenario files for each variation of scenario using the scenario_variation executable, you can pass your own custom scenario as an input. For this exercise, we will use a scenario present in examples/example_scenario_variation/.
scenario_variation examples/example_scenario_variation/example_scenario_variation.osc
This will save scenario variation files with the .sce extension in the out folder within the current working directory.
To execute the generated scenario variations, run the scenario_batch_execution executable. This command will process all scenarios files present in the out folder and execute them sequentially.
scenario_batch_execution -i out -o scenario_output -- ros2 run scenario_execution_ros scenario_execution_ros {SCENARIO} --output-dir {OUTPUT_DIR}
above command requires three arguments.
-i: directory where the scenario files.sceare stored
-o: directory where the outputlogandxmlfiles will be saved (for each scenario file within a separate folder)
-- ros2 run scenario_execution_ros scenario_execution_ros {SCENARIO} --output-dir {OUTPUT_DIR}: launch command to launch scenarios
Note
scenario_batch_execution can be used for any scenario-files, not only those generated by scenario_variation.
The return code of scenario_batch_execution is 0 if all tested scenarios succeeded. The output can be found within the specified output-folder:
<output_folder>/
   text.xml        # overall test result (summary of all tested scenarios)
   <scenario1>/    # directory for scenario
      test.xml     # test result of scenario
      log.txt      # log output of scenario execution
      ...          # other files generated by scenario execution run (e.g. rosbag)
Note
scenario_batch_execution creates a junit xml compatible file that can easily be integrated into a CI pipeline. An example can be found here: .github/workflows/test_build.yml
Override scenario parameters
To override scenario parameters, specify the required parameters within a yaml file and use the command-line parameter --scenario-parameter-file.
Let's look at the following example scenario my_scenario.osc with the parameter my_base_param and my_struct_param.
import osc.helpers

scenario my_scenario:
    my_base_param: string = "default value"
    my_struct_param: position_3d
    do serial:
        log(my_base_param)
        log(my_struct_param)
To override the parameter, the following yaml file overrides.yaml can be used.
my_scenario:
  my_base_param: "my_val"
  my_struct_param:
    x: 1.0
    y: 2.0
    z: 0.0
The following command executes the scenario with the defined override.
ros2 run scenario_execution_ros scenario_execution_ros --scenario-parameter-file overrides.yaml my_scenario.osc
If physical literals get overridden, the values are expected in SI base units: For example specify value in meter (e.g. 42.0) for length; specify value in seconds for time.