Tutorials
Code for all tutorials is available in examples.
Define and Execute Scenario
To create a scenario in OpenSCENARIO DSL syntax, first create a file
with the extension .osc. Input the following code in the file.
# import the libraries with import expression
import osc.types
import osc.helpers

# declare the scenario by the syntax: "scenario scenario_name:"
scenario hello_world:
    # define the content of the scenario with "do_directive"
    do serial: # execute children one after the other
        log("Hello World!") # log a message on the screen with "log" action from the built-in library
        wait elapsed(3s)   # wait three seconds
        log("Good Bye!")         # log another message
The first two lines import osc.types and import osc.helpers will import the named libraries that provide required definitions. In this example helpers library provides the log action and types provides the definition of the s unit to specify seconds.
Note
Comments in OpenSCENARIO DSL always start with #.
Then, a scenario with the name hello_world get declared. The following colon states that all following and indented lines
are part of it. The single top-level action of the scenario is defined in the do directive.
The term serial states that the included actions will be executed in sequence.
Note
OpenSCENARIO DSL supports the following compositions:
parallel: execute actions in parallel, continue afterwardsserial: execute actions, one after the otherone_of: execute actions in parallel, continue after one finished
Use the log action, defined within the imported library, to log a message Hello World! on the
screen. After the log action is invoked, the wait directive makes the scenario execution to wait for 3 seconds. Afterwards another log action is triggered and the scenario ends afterwards.
Note
Scenario execution uses the predefined events end and fail to detect success or failure of a scenario. If no emit end or emit fail is defined, a success is assumed.
Note
It is good practice to define a timeout modifier within a scenario to avoid that failing scenarios run forever.
scenario example:
    timeout(60s)
    do serial:
        ...
Use this code to see a launch of this tutorial:
colcon build --packages-up-to scenario_execution_ros && source install/setup.bash \
&& ros2 launch scenario_execution_ros scenario_launch.py scenario:=examples/example_scenario/hello_world.osc
Create Scenario Library
To add new features to scenario execution, extensions libraries can be created. An extension library typically provides one or more OpenSCENARIO DSL definition files and might additionally provide action implementations.
To show how to create such a library for scenario execution, we will add a custom_action action as an example.
First, we need to define the custom_action in a OpenSCENARIO DSL file.
action custom_action:
     data: string
The data parameter is used to pass the data of type string to the action plugin implementation.
Then, we can write the implementation of action plugin in Python.
from scenario_execution.actions.base_action import BaseAction

class CustomAction(BaseAction):

    def __init__(self):
        super().__init__()

    def execute(self, data: str):
        self.data = data

    def update(self):
        print(f"Custom Action Triggered. Data: {self.data}")
        return py_trees.common.Status.SUCCESS
In the example, we created a custom action plugin to print a message on the
screen. The first step is to create an action implementation, based on the class BaseAction.
There are two methods that can be overloaded in order to receive the action arguments as defined in the osc file.
__init__()function which is called once for each action instance. It can consume any of the arguments defined within the scenario file. If there are long-running initialization tasks, it is good practice to execute those withinsetup(), which is also only called once.execute()function is called when the action gets active. It receives all remaining arguments, that are not consumed within__init__(). It is good practice to consume as many arguments as possible here, to allow late-resolving (e.g. receiving the latest value from variables or external methods).
The action plugin custom_action only defines one parameter data, so the behavior only has to accept data as an
argument. Then, override the update() function to define how the
behavior works. In this case, the behavior prints the message on the screen
and then returns success. Please refer to the py_trees documentation for details.
After we wrote the library, we need to add it to the
scenario_execution.actions and scenario_execution.osc_libraries entry points, so that the parser can
find it.
Open up the setup file for your Python package setup.py and add these lines to the
entry_points section.
entry_points={
 'scenario_execution.actions': [
     'custom_action = example_library.custom_action:CustomAction',
 ],
  'scenario_execution.osc_libraries': [
      'example = example_library.get_osc_library:get_example_library',
  ]
}
To ship the osc library, a MANIFEST.in must be created and include_package_data=True must be enabled within setup.py.
Now, you can use the library and the action custom_action within your scenarios:
import osc.example

scenario example_library:
    do serial:
        custom_action(data: 'foo')
        emit end
Use this code to see a launch of this tutorial:
colcon build --packages-up-to example_library && source install/setup.bash \
&& ros2 launch scenario_execution_ros scenario_launch.py scenario:=examples/example_library/scenarios/example_library.osc
Create Navigation Scenario
A simple example scenario for spawning a simulated Turtlebot4 in Gazebo and control it with Nav2, can be found in examples/example_nav2/example_nav2.osc.
This scenario files looks as follows:
import osc.ros

scenario nav2_simulation_nav_to_pose:
    robot: differential_drive_robot
    do parallel:
        test_drive: serial:
            robot.init_nav2(pose_3d(position_3d(x: 0.0m, y: 0.0m)))
            robot.nav_to_pose(pose_3d(position_3d(x: 3.0m, y: -3.0m)))
            robot.nav_to_pose(pose_3d(position_3d(x: 0.0m, y: 0.0m)))
            emit end
        time_out: serial:
            wait elapsed(120s)
            emit fail
Let’s break down the individual components of the scenario. The following snippet defines the turtlebot4 amr-object.
turtlebot4: differential_drive_robot: # define turtlebot4 robot
The do parallel runs the actual test drive and a time-out in
parallel. In case something goes wrong, the time-out prevents the
scenario from running indefinitely by canceling it after 2 minutes and
marking it as failed.
Before being able to navigate, nav2 needs to be initialized. This includes setting the initial pose of the Nav2 localization module AMCL.
turtlebot4.init_nav2(pose_3d(position_3d(x: 0.0m, y: 0.0m))) # initialize Nav2
Finally, the following snippet calls the Nav2 NavigateToPose action to make the robot navigate to a specified goal pose and back to the starting position
turtlebot4.nav_to_pose(pose_3d(position_3d(x: 3.0m, y: -3.0m)))
turtlebot4.nav_to_pose(pose_3d(position_3d(x: 0.0m, y: 0.0m)))
Once the robot reached the final goal pose emit end finishes the
scenario and marks it as successful.
To try this example, run
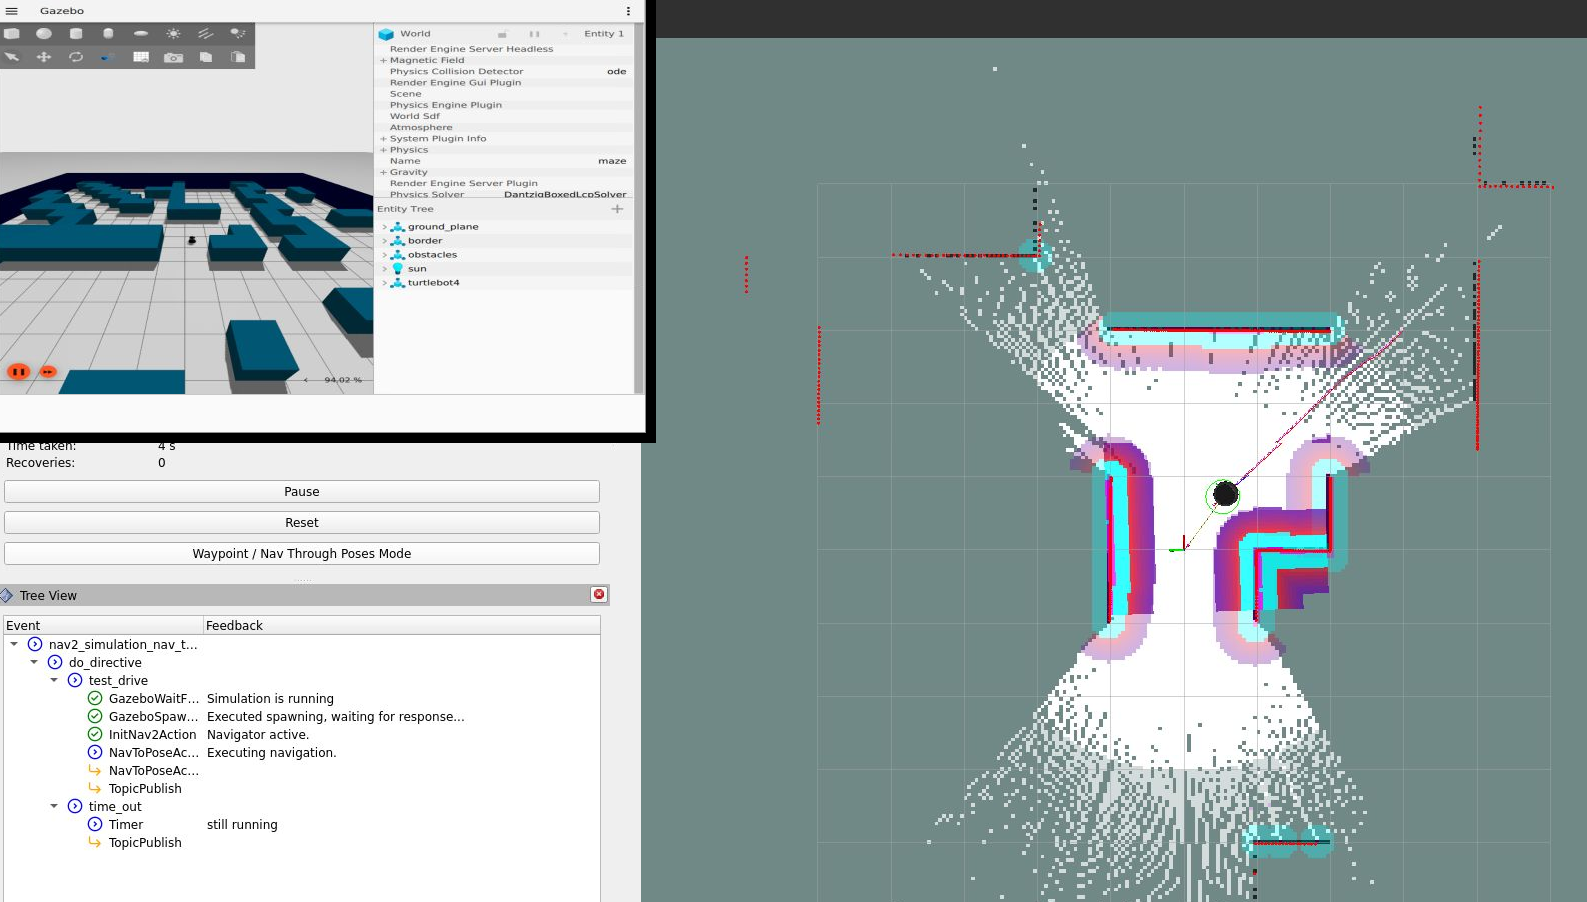
ros2 launch tb4_sim_scenario sim_nav_scenario_launch.py scenario:=examples/example_nav2/example_nav2.osc headless:=False
and you should see something like this
Turtlebot4 NAV2 scenario
In case you want to run the navigation with SLAM instead of AMCL, update
the above described scenario by setting the use_initial_pose to False:
import osc.ros

scenario nav2_simulation_nav_to_pose:
    robot: differential_drive_robot
    do parallel:
        test_drive: serial:
            robot.init_nav2(
                initial_pose: pose_3d(position_3d(x: 0.0m, y: 0.0m)),
                use_initial_pose: false)
            robot.nav_to_pose(pose_3d(position_3d(x: 3.0m, y: -3.0m)))
            robot.nav_to_pose(pose_3d(position_3d(x: 0.0m, y: 0.0m)))
            emit end
        time_out: serial:
            wait elapsed(120s)
            emit fail
Then, run:
ros2 launch tb4_sim_scenario sim_nav_scenario_launch.py scenario:=examples/example_nav2/example_nav2.osc headless:=false slam:=True
and you should see something like this
Turtlebot4 NAV2 scenario SLAM
Create Scenarios with Variations
In this example, we'll demonstrate how to generate and run multiple scenarios using only one scenario definition.
For this we'll use the scenario_execution_coverage/scenario_execution_coverage/scenario_variation. to save the intermediate scenario models in .sce extension file and then use scenario_execution_coverage/scenario_execution_coverage/scenario_batch_execution to execute each generated scenario.
The scenario file looks as follows:
import osc.helpers

scenario test_log:
    do serial:
        log() with:
            keep(it.msg in ["foo", "bar"])
        emit end
Here, a simple scenario variation example using log action plugin is created and two messages foo and
bar using the array syntax are passed.
As this is not a concrete scenario, scenario_execution won't be able to execute it. Instead we'll use scenario_variation from the scenario_execution_coverage package to generate all variations and save them to intermediate scenario model files with .sce extension.
Afterwards we could either use scenario_execution to run each created scenario manually or make use of scenario_batch_execution which reads all scenarios within a directory and executes them one after the other.
Now, lets try to run this scenario. To do this, first build Packages scenario_execution and scenario_execution_coverage:
colcon build --packages-up-to scenario_execution_ros && colcon build --packages-up-to scenario_execution_coverage
Now, create intermediate scenarios with
.sceextension using the command:
scenario_variation examples/example_scenario_variation/example_scenario_variation.osc
In the command mentioned above we passed the scenario file as the parameter. You can also specify the output directory for the scenario files using the -t option. If not specified, the default folder out will be created in the current working directory.
Next,
run scenario fileswith following command.
scenario_batch_execution -i out -o scenario_output -- ros2 launch scenario_execution scenario_launch.py scenario:={SCENARIO} output_dir:={OUTPUT_DIR}
Let's break down this command.
In the first part we run the executable scenario_batch_execution. This requires the following parameters to execute.
Directory where the scenario files
.scewere saved as the input option-i.Directory where the output
logandxmlfiles will be saved as the output option-o.Launch command to launch scenarios
-- ros2 launch scenario_execution_ros scenario_launch.py scenario:={SCENARIO} output_dir:={OUTPUT_DIR}.
Finally, The output of the above command will display two values foo and bar on the terminal along with the success message.
Control Scenarios with Rviz
In this example, let's learn how to control multiple scenarios directly from RVIZ control panel.
We'll use examples/example_scenario_control/ as the base package to launch scenes turtlebot4 inside the simulation environment.
You can add your custom scenario files to the scenario folder inside the package. However, for this tutorial, we'll use the existing scenarios present there. Let's run an example.
First, build the package using the following command:
colcon build --packages-up-to examples/example_scenario_control
Now, run the following command to launch the simulation:
ros2 launch example_scenario_control example_scenario_control_launch.py
Both Gazebo and Rviz will launch. Now, you can use the control panel to select a specific scenario from the drop-down list. Run it by clicking the play icon, as shown in the figure below:
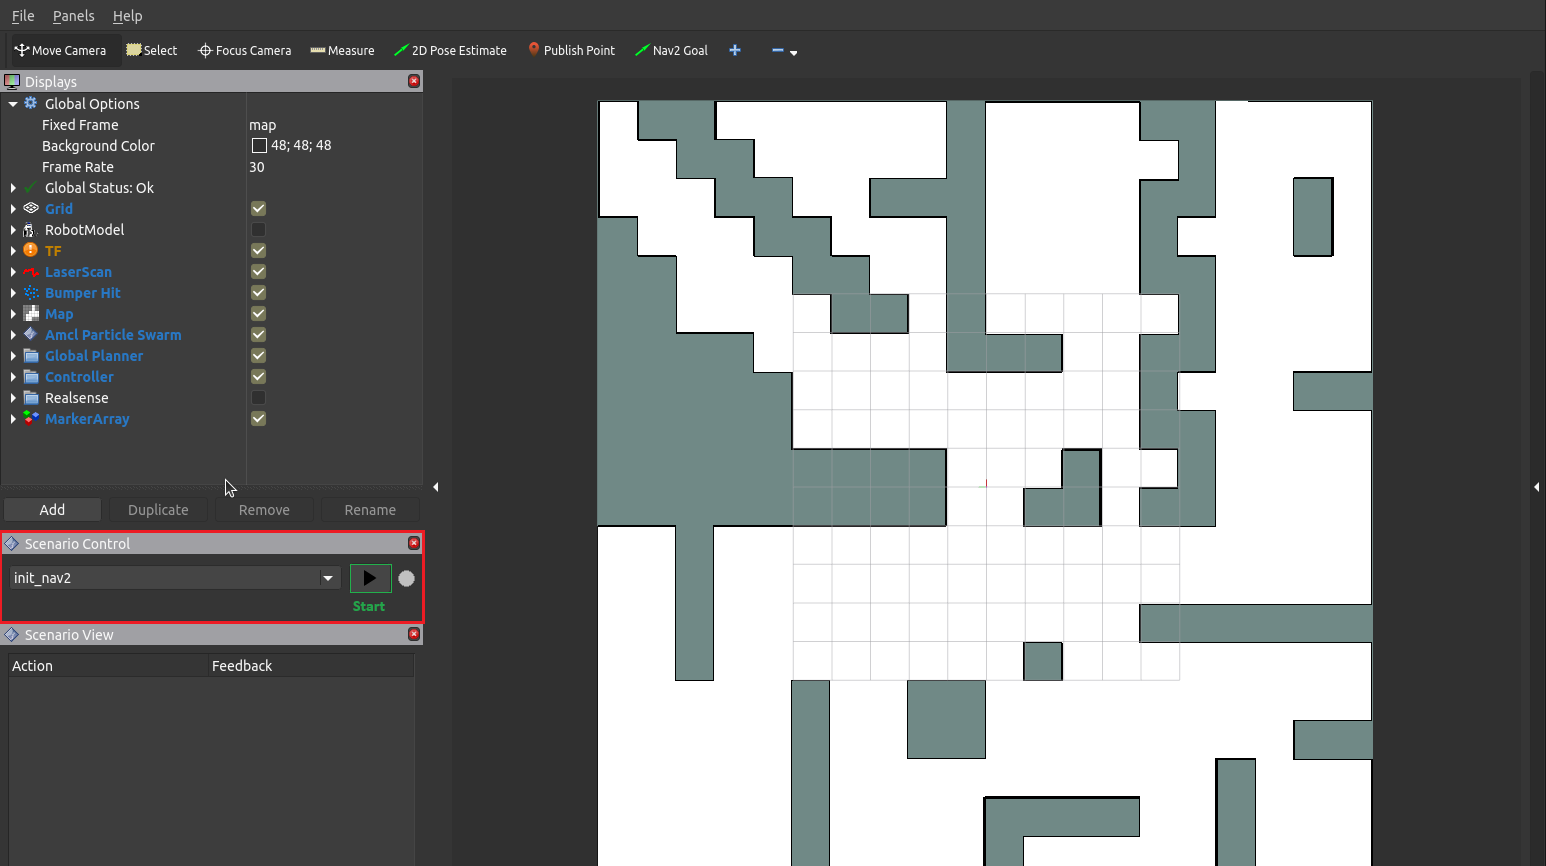
Scenario Control Start
When the scenario starts, the small circle will turn green, as shown below:
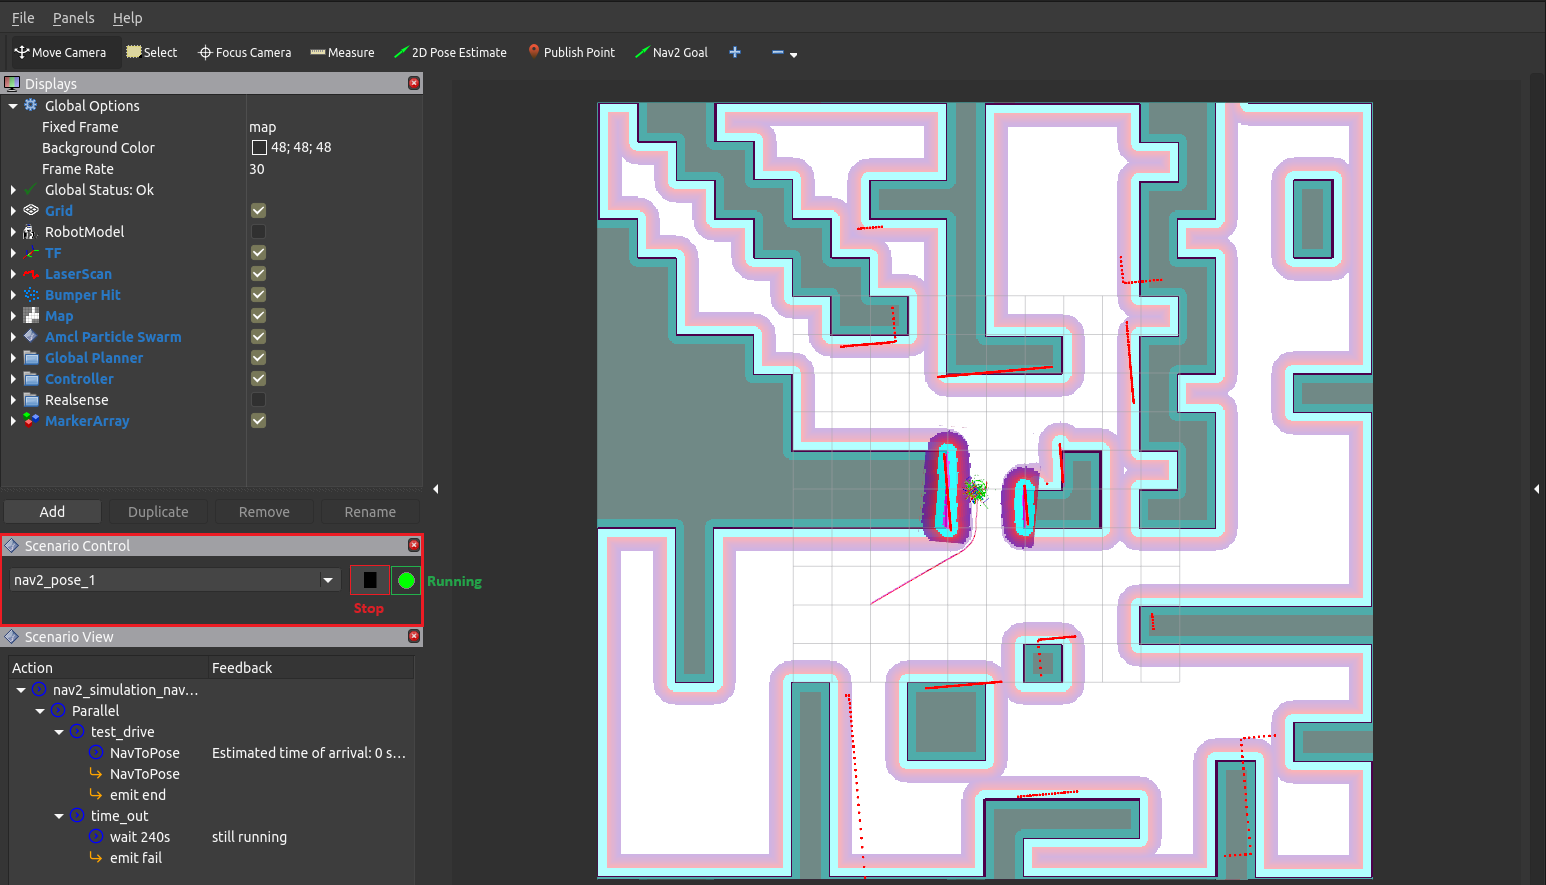
Scenario Control Running
In this tutorial, we have three scenarios. The first, init_nav2, initializes the robot. The other two, nav_to_paose_1 and nav_to_pose_2, navigate the robot to specific poses.
After completing the initialization scenario, you can run any of the nav_to_pose scenarios using the drop-down menu.
Note
While the scenario is running, you can click the stop/pause button to terminate it. Afterwards, you have the option to either start the same scenario again or choose another one.
Currently, terminating the scenario will not stop the ongoing navigation, and the robot will continue to move towards its goal pose. However, please note that this behavior will be addressed in future updates.
Use External Methods
It is possible to call external python methods and use their return value within a scenario. A basic example of this functionality can be found in examples/example_external_method/ providing a factorial method.
import osc.types
import osc.helpers

struct lib:
    def factorial(n: int) -> int is external example_external_method.external_methods.factorial.factorial()

scenario example_external_method:
    do serial:
        log(lib.factorial(4))
The external method, defined within a python module (in this example example_external_method.external_methods.factorial.factorial()) is referenced within an osc definition with the same signature using the external keyword.
Note
The osc definition of an external method needs to be placed within a composition type (e.g. a struct) and can be called by using <struct-name>.<method-name>.
Use this code to see a launch of this tutorial:
colcon build --packages-up-to example_external_method && source install/setup.bash \
&& ros2 run scenario_execution scenario_execution examples/example_external_method/scenarios/example_external_method.osc